深度学习环境配置
本文记录一下深度学习的环境配置:
1.查看已安装的CUDA和cudnn版本号
2.CUDA, CUDA toolkit, CUDNN和NVCC关系参考资料:
3.安装CUDA和cudnn到指定目录。安装cudatoolkit:参考资料:
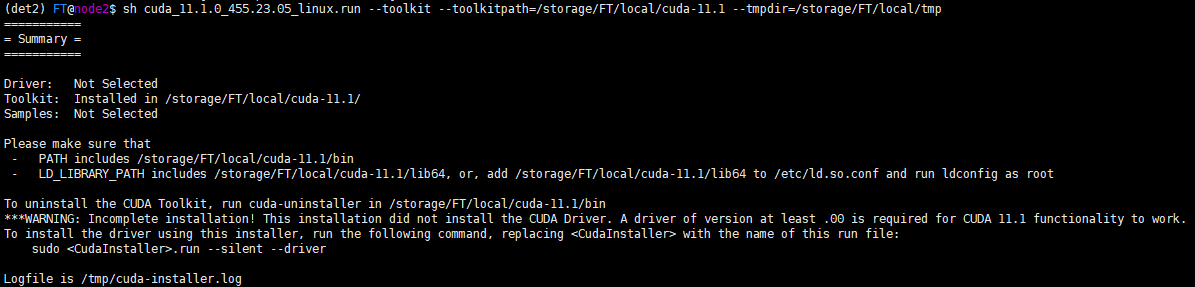
sh cuda_11.1.0_455.23.05_linux.run --help:查看选项sh cuda_11.1.0_455.23.05_linux.run --toolkit --toolkitpath=/storage/FT/local/cuda-11.1 --tmpdir=/storage/FT/local/tmp:指定安装选项,安装目录,和tmp目录- 运行上述步骤后会出现交互式界面让你选择安装哪些部分,可以根据需求选择。
安装完的界面如下所示:
4.进行模型训练时出现`Could not load dynamic library 'libnvinfer.so.7'`。此为TensorFlow警告,可以通过设置环境变量:参考资料:
export TF_CPP_MIN_LOG_LEVEL="2"5.VSCode配置OpenCV (Windows)参考资料:
6. 将home目录下的.vscode-server迁移至其他目录 例如,迁移到`/storage/user`下面: 1. `cd /storage/user` 2. `mv ~/.vscode-server ./` 3. `ln -s /storage/user/.vscode-server ~/.vscode-server`参考资料:
7.查看当前目录文件夹占用大小:`du -lh --max-depth=1` > 参考资料: > 1. [du](https://wangchujiang.com/linux-command/c/du.html) 8.将home目录下的.cache迁移至其他目录 例如,迁移到`/storage`下面: 1. `cd /storage` 2. `mv ~/.cache ./` 3. `ln -s /storage/user/.cache ~/.cache` 9.安装OpenCV C++版: > 参考资料: > 1. [超详细windows 安装opencv以及在VS中配置opencv_sqzeng的博客-CSDN博客](https://blog.csdn.net/zengshaoqing/article/details/105046277) > 2. [[C/C++] OpenCV 4.1.0 windows下安装、配置实践及问题解决_枪枪枪的博客-CSDN博客_opencv c++安装](https://blog.csdn.net/az9996/article/details/89715309) > 3. [如何在 Visual Studio 2022 安裝 OpenCV C++ 開發環境? - 偵錯桐人](https://tedliou.com/opencv-cpp-visual-studio-2022/) 10.在Windows10上安装Caffe: > 参考资料: > 1. [Windows10 下RTX30系列Caffe安装教程 - BrianX - 博客园](https://www.cnblogs.com/zhongzhaoxie/p/15267489.html) > 2. [教程 | Caffe在Windows10系统上安装与配置 - 腾讯云开发者社区-腾讯云](https://cloud.tencent.com/developer/article/1545949) > 3. [Site Unreachable](https://www.zmonster.me/2015/07/21/caffe-base-usage.html) > 4. [VS2015下载地址和安装教程(图解)](http://c.biancheng.net/view/453.html) > 5. [Caffe: Problem in downloading prebuilt dependenies · Issue #5679 · BVLC/caffe · GitHub](https://github.com/BVLC/caffe/issues/5679) > 6. [如何在 Windows 10(GPU) 環境中安裝 Caffe framework--VS2015+CUDA10.0+Python3.5.6篇](https://davistseng.blogspot.com/2020/01/windows-10gpu-caffe-framework.html) > 7. [Download Visual Studio 2015 (ISO / Offline Installer + Web Installer) | Kunal Chowdhury](https://www.kunal-chowdhury.com/2015/07/download-visualstudio-2015.html) > 8. [Caffe+Visual Studio 2015编译可以有多简单?_冰不语的博客-CSDN博客](https://blog.csdn.net/xingchenbingbuyu/article/details/72765612) > 9. [Caffe Windows 配置 - 黄钢的部落格|Canary Blog](https://alberthg.github.io/2018/04/12/Caffe-Windows-%E9%85%8D%E7%BD%AE%E8%AE%B0%E5%BD%95/) > 10. [protobuf requires Python ‘>=3.7‘ but the running Python is 3.6.5的解决方法_LucyGill的博客-CSDN博客](https://blog.csdn.net/LucyGill/article/details/125268665) 11.在Python环境中用Caffe创建LeNet: > 参考资料: > 1. [Solving in Python with LeNet](https://nbviewer.org/github/BVLC/caffe/blob/master/examples/01-learning-lenet.ipynb) 12.`opencv` vs `opencv-contrib-python` vs `opencv-python-headless` vs `opencv-contrib-python-headless`参考资料:
13.关闭启动Ubuntu环境时自动启动anaconda参考资料:
conda config --set auto_activate_base false18.安装`pydensecrf`时出现如下报错:  原因:`pydensecrf`不支持python3.7。 解决方案1:已验证python3.6.13的环境可以安装 解决方案2:从git安装更新版本 `pip install git+https://github.com/lucasb-eyer/pydensecrf.git`。但由于服务器上对git的访问不稳定,直接按上述方法安装响应很慢。此时可以按照如下步骤(参考资料5)安装: - 先下载git仓库的`pydensecrf-master.zip`文件,`unzip pydensecrf-master.zip`。 - `cd pydensecrf-master` - `pip install .` > 参考资料: > 1. [PyDenseCRF 包的安装与使用(1)_彦&博的博客-CSDN博客](https://blog.csdn.net/hongyanjinli/article/details/114481913) > 2. [GitHub - lucasb-eyer/pydensecrf: Python wrapper to Philipp Krähenbühl's dense (fully connected) CRFs with gaussian edge potentials.](https://github.com/lucasb-eyer/pydensecrf) > 3. [Install by pip fails in Python 3.7](https://github.com/lucasb-eyer/pydensecrf/issues/78) > 4. [python - How to use pydensecrf in Python3.7? - Stack Overflow](https://stackoverflow.com/questions/62517791/how-to-use-pydensecrf-in-python3-7) > 5. [install python module using a zip file - Stack Overflow](https://stackoverflow.com/questions/30148335/install-python-module-using-a-zip-file) 19.从git仓库进行`pip install`参考资料:
20.为什么不应该用`pip install`,应该用`python -m pip install`?参考资料:
21.更改anaconda默认环境:参考资料:
22.使用crontab执行定时任务: - 创建应该编写crontab文件,例如`FTcron`,内容如下:参考资料:
- command line - Anaconda change ‘base’ environment permanently to a different environment ‘myenv’ to startup at terminal openings - Ask Ubuntu
- How to change default Anaconda python environment - Stack Overflow
- macos - calling conda source activate from bash script - Stack Overflow
- python - CommandNotFoundError: Your shell has not been properly configured to use ‘conda activate’ - Stack Overflow
SHELL=/bin/bash
PATH=/usr/bin:/bin:/storage/FT/anaconda3/bin
0 20 * * * source activate py38; cd /storage/FT/SCWSSOD/SCWSSOD49; nohup python
test.py>test.out
30 20 * * * source activate py38; cd /storage/FT/SCWSSOD/SCWSSOD50; nohup python test.py>test.out