python中知识点01
本文记录一下python中常用的知识点:
1.在Python shell中清屏。在Windows和Linux中的实现原理均为调用os.system提供的清屏函数。
-
Windows:
import os
clear = lambda: os.system('cls')
然后调用
clear()即可。也可以直接运行os.system('cls')。 -
Linux:
import os
clear = lambda: os.system('clear')
然后调用
clear()即可。也可以直接运行os.system('clear')。
为了避免每次启动Python shell后都需要重新定义clear函数。可以设置如下脚本:
import os
if os.name == 'nt':
	def cls():
		_ = os.system('cls')
else:
	def clear():
		_ = os.system('clear')
并使得上述脚本在启动Python shell时自动运行。
参考资料:
2.设置在Python shell启动时自动执行某个脚本。
下面记录在Ubuntu系统中的设置:
-
创建脚本并写入想要执行的命令,例如创建
startup.py并写入:import os if os.name == 'nt': def cls(): _ = os.system('cls') else: def clear(): _ = os.system('clear')该脚本在打开Python shell中创建了函数
clear(),可以通过执行clear()实现清屏。 -
在当前Ubuntu系统中使得环境变量
PYTHONSTARTUP指向上述脚本对应的路径,假设上述脚本路径为/home/FT/scripts/startup.py。则可以通过在bash中执行export PYTHONSTARTUP=/home/FT/scripts/startup.py创建临时环境变量,也可以在
~/.bashrc中添加该命令使其永久化。 -
此时在bash中打开python shell(包括Anaconda中的python shell),可直接通过
clear()实现清屏。
下面记录在Windows系统中的设置:
-
创建脚本并写入想要执行的命令,例如上述的
startup.py。 -
添加用户环境变量
PYTHONSTARTUP: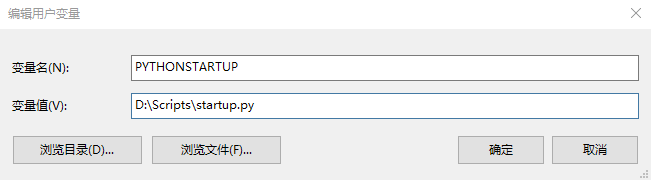
-
打开cmd,运行
refreshenv(需安装Chocolatey)更新环境变量。 -
运行
python,会发现startup.py中的命令已生效。
参考资料:
3.Python中的metaclass。
类也是对象
Python关于类是什么这个问题有古怪的答案,它借鉴了来自Smalltalk语言的设计。
在大多数语言中,类只是描述如何生成一个对象的代码段。在Python中差不多也是这样的:
>>> class ObjectCreator(object):
...       pass
...

>>> my_object = ObjectCreator()
>>> print(my_object)
<__main__.ObjectCreator object at 0x8974f2c>
但是类在Python中意味着更多。类本身也是对象。
只要你使用关键字class,Python就会执行它并创建一个对象。以下的指令:
>>> class ObjectCreator(object):
...       pass
...在内存中创建了一个名为ObjectCreator的对象。
这个对象(即这个类)它自身具有可以创建对象(即实例)的能力,这就是为什么它是一个类。
但是,它仍然是一个对象,因此:
- 你可以将它赋值给一个变量
- 你可以打印它
- 你可以复制它
- 你可以给它添加属性
- 你可以把它作为函数参数传递
例如:
>>> print(ObjectCreator) # you can print a class because it's an object
<class '__main__.ObjectCreator'>
>>> def echo(o):
...       print(o)
...
>>> echo(ObjectCreator) # you can pass a class as a parameter
<class '__main__.ObjectCreator'>
>>> print(hasattr(ObjectCreator, 'new_attribute'))
False
>>> ObjectCreator.new_attribute = 'foo' # you can add attributes to a class
>>> print(hasattr(ObjectCreator, 'new_attribute'))
True
>>> print(ObjectCreator.new_attribute)
foo
>>> ObjectCreatorMirror = ObjectCreator # you can assign a class to a variable
>>> print(ObjectCreatorMirror.new_attribute)
foo
>>> print(ObjectCreatorMirror())
<__main__.ObjectCreator object at 0x8997b4c>
动态地创建类
因为类是对象,所以你可以像任何对象那样自由地创建他们。
首先,你可以在一个函数中使用class创建一个类:
>>> def choose_class(name):
...     if name == 'foo':
...         class Foo(object):
...             pass
...         return Foo # return the class, not an instance
...     else:
...         class Bar(object):
...             pass
...         return Bar
...
>>> MyClass = choose_class('foo')
>>> print(MyClass) # the function returns a class, not an instance
<class '__main__.Foo'>
>>> print(MyClass()) # you can create an object from this class
<__main__.Foo object at 0x89c6d4c>
但是它不够动态,因为你仍然需要自己写整个类。
因为类是对象,它们必须被某个东西生成。
当你使用class关键字的时候,Python自动地创建了这个对象。但是和在Python中的大多数东西一样,它给了你手动来做这件事的方法。
记得函数type吗?这个好的古老的函数让你知道一个对象是什么类型。
>>> print(type(1))
<type 'int'>
>>> print(type("1"))
<type 'str'>
>>> print(type(ObjectCreator))
<type 'type'>
>>> print(type(ObjectCreator()))
<class '__main__.ObjectCreator'>其实,type还有一个完全不同的能力,它也能够自由地创建类。type可以将一个类的描述作为参数,然后返回一个类。
(注:虽然相同的函数根据传给它参数的不同有两种完全不同的用途看起来很蠢。但是type的这种情况是由于Python向后兼容所导致的问题)
type以下面的方式起作用:
type(name, bases, attrs)其中:
name:类名bases:父类的元组(用于继承,可以为空)attr:字典,包含属性名和属性值
例如:
>>> class MyShinyClass(object):
...       pass
可以通过以下的方式手动创建:
>>> MyShinyClass = type('MyShinyClass', (), {}) # returns a class object
>>> print(MyShinyClass)
<class '__main__.MyShinyClass'>
>>> print(MyShinyClass()) # create an instance with the class
<__main__.MyShinyClass object at 0x8997cec>可以注意到我们同时使用MyShinyClass作为类名并且作为变量来做类引用。它们可以不同,但是没有必要使问题复杂化。
type接受一个字典来定义类的属性。所以:
>>> class Foo(object):
...       bar = True
也能被翻译为:
>>> Foo = type('Foo', (), {'bar':True})并且作为一个普通类使用:
>>> print(Foo)
<class '__main__.Foo'>
>>> print(Foo.bar)
True
>>> f = Foo()
>>> print(f)
<__main__.Foo object at 0x8a9b84c>
>>> print(f.bar)
True当然,你也可以从Foo继承它,所以:
>>>   class FooChild(Foo):
...         pass
将会是:
>>> FooChild = type('FooChild', (Foo,), {})
>>> print(FooChild)
<class '__main__.FooChild'>
>>> print(FooChild.bar) # bar is inherited from Foo
True
最后,你想向你的类中添加方法。只需定义一个具有合适标识的函数并且将其作为一个属性给它赋值。
>>> def echo_bar(self):
...       print(self.bar)
...
>>> FooChild = type('FooChild', (Foo,), {'echo_bar': echo_bar})
>>> hasattr(Foo, 'echo_bar')
False
>>> hasattr(FooChild, 'echo_bar')
True
>>> my_foo = FooChild()
>>> my_foo.echo_bar()
True
参考资料:
4.目前pip已经不提供pip search <package name>的服务,运行后会出现以下报错:

此时,可以通过在 duckduckgo 搜索 !pip <package name>来获得相关的package信息。
参考资料:
5.pip安装指定版本package:pip install Package_name==version。例如:
pip install mmdet==2.12.0参考资料:
6.Python中两个有用的函数:
dir():help():
参考资料:
7.根据字符串常量动态创建以字符串命名的变量:
参考资料:
8.当通过socket创建本地服务器时:
import socket

HOST, PORT = '', 8888

listen_socket = socket.socket(socket.AF_INET, socket.SOCK_STREAM)
listen_socket.setsockopt(socket.SOL_SOCKET, socket.SO_REUSEADDR, 1)
listen_socket.bind((HOST, PORT))
listen_socket.listen(1)
print('Serving HTTP on port %s ...' % PORT)
while True:
    client_connection, client_address = listen_socket.accept()
    request = client_connection.recv(1024)
    print(request.decode("utf-8"))

    http_response = """\
HTTP/1.1 200 OK

Hello, World!
"""
    client_connection.sendall(http_response.encode("utf-8"))
    client_connection.close()
运行该脚本可能发生以下情况:

其原因为本地端口8888被其他的应用占用(本例中其被Charles占用),解决方法为使用其他的端口。
参考资料:
8.如下,构建本地代理服务器来请求https://www.baidu.com:
# 代理
from urllib.error import URLError
from urllib.request import ProxyHandler, Request, build_opener

proxy_handler = ProxyHandler({
    'http': 'http://127.0.0.1:9743',
    'https': 'https://127.0.0.1:10000'
})
url = "https://www.baidu.com"
# request = Request(url)
opener = build_opener(proxy_handler)
try:
    response = opener.open(url)
    # response = opener.open(request)
    print(response.read().decode('utf-8'))
except URLError as e:
    print(e.reason)
运行后会出现如下情况:

此时注释掉构建的https代理服务器:
# 'https': 'https://127.0.0.1:10000'运行正常:
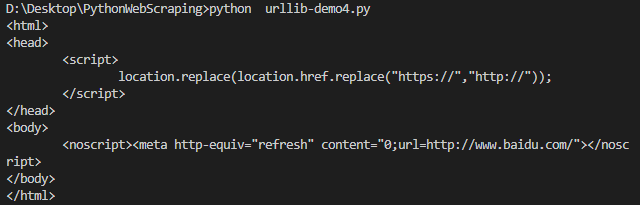
故推测是构建的https型代理服务器出现问题,有待探究。
9.下面两段代码的区别:参考资料:
def max(a, b):
	if a>b:
		return a
	return b
def max(a, b):
if a>b:
return a
else:
return btest_str = 'helloworld'
if 'world' in test_str:
print('yes')
else:
print('no')TAG = 'scwssod'
id = 30
filename = 'mytest_%s_model-%d.log'%(TAG, id)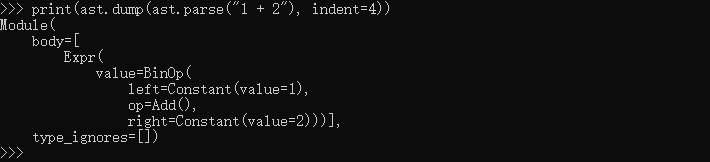
13.Python按键 (key) 或值 (value) 对字典进行排序 - 按键排序:参考资料:
- 《代码之髓》3.2节
ast— Abstract Syntax Trees
# 声明字典
key_value ={}

# 初始化
key_value[2] = 56
key_value[1] = 2
key_value[5] = 12
key_value[4] = 24
key_value[6] = 18
key_value[3] = 323

print ("按键(key)排序:")

# sorted(key_value) 返回重新排序的列表
# 字典按键排序
for i in sorted (key_value) :
print ((i, key_value[i]), end =" ") # 声明字典
key_value ={}
# 初始化
key_value[2] = 56
key_value[1] = 2
key_value[5] = 12
key_value[4] = 24
key_value[6] = 18
key_value[3] = 323
print ("按值(value)排序:")
print(sorted(key_value.items(), key = lambda kv:(kv[1], kv[0]))) with open("test.txt", "a") as file:
file.truncate(0)18.Python中的`next()`函数: - 描述:`next()`函数返回iterator的下一个项目,主要和生成迭代器的`iter()`一起使用 - 语法:`next(iterable[,defaulat]` - 参数说明:iterable为可迭代对象,default可选,用于设置在没有下一个元素时返回该默认值,如果不设置又没有下一个元素,会触发`StopIteration`异常 - 返回值:返回下一个item。 - 实例:对于一个pytorch中的`DataLoader`对象,可以如下使用:参考资料:
from torch.utils.data import Dataset, DataLoader
class myDataset(Dataset):
	...
dataset = myDataset(...)
loader = DataLoader(dataset, batch_size=16, shuffle=True, num_workers=8)
iter_loader = iter(loader) # 生成迭代器
next_input, next_target, _ , _ = next(iter_loader) # 访问迭代器下一个item>>> seasons = ['Spring', 'Summer', 'Fall', 'Winter']
>>> list(enumerate(seasons))
[(0, 'Spring'), (1, 'Summer'), (2, 'Fall'), (3, 'Winter')]
>>> list(enumerate(seasons, start=1)) # 下标从 1 开始
[(1, 'Spring'), (2, 'Summer'), (3, 'Fall'), (4, 'Winter')]
>>> seq = ['one', 'two', 'three']
>>> for i, element in enumerate(seq):
... print i, element
...
0 one
1 two
2 threeCould not install packages due to an OSError: [WinError 5]pip3 install --upgrade albumentations --userpython -m pip install --upgrade pip24.导出pip list到`requirements.txt`文件在另一个环境中安装:参考资料:
## 导出
pip freeze >requirements.txt
## 安装
pip install -r requirements.txtresult = None
for i in range(10):
if i == 0:
result = i
else:
result += i# A Python program to demonstrate working of OrderedDict
from collections import OrderedDict
print("This is a Dict:n")
d = {}
d['a'] = 1
d['b'] = 2
d['c'] = 3
d['d'] = 4
for key, value in d.items():
print(key, value)
print("nThis is an Ordered Dict:n")
od = OrderedDict()
od['a'] = 1
od['b'] = 2
od['c'] = 3
od['d'] = 4
for key, value in od.items():
print(key, value)
Output:
This is a Dict:
('a', 1)
('c', 3)
('b', 2)
('d', 4)
This is an Ordered Dict:
('a', 1)
('b', 2)
('c', 3)
('d', 4)import argparse
parser = argparse.ArgumentParser()
parser.add_argument('--a', type=int, default=55)
parser.add_argument('--b', type=int, default=66)
parser.add_argument('--c', type=int, default=77)
args = parser.parse_args()
print(args)
# vars() 函数返回对象object的属性和属性值的字典对象。
for arg in vars(args):
print(arg, ':', getattr(args, arg)) # getattr() 函数是获取args中arg的属性值# test.py
import sys
sys.path.insert(0, "..")
import mmseg# test.py
import sys
sys.path.insert(0, "..")
sys.path.insert(0, ".") # 添加本地路径
import mmsegimport json
x = txt_content # 复制赋值或从txt读取
with open("cfg.json", 'w') as outfile:
json.dump(x, outfile, indent=2)>> import operator
>> operator.eq('hello', 'name')
False
>> operator.eq('hello', 'hello')
Trueoperator.lt(a, b)
operator.le(a, b)
operator.eq(a, b)
operator.ne(a, b)
operator.ge(a, b)
operator.gt(a, b)
operator.__lt__(a, b)
operator.__le__(a, b)
operator.__eq__(a, b)
operator.__ne__(a, b)
operator.__ge__(a, b)
operator.__gt__(a, b)print(os.path.expanduser(os.path.abspath(__file__)))22.Python中的*号。
>>> x, y = (1, 2, 3)
ValueError: too many values to unpack (expected 2)

>>> x, *y = 1, 2, 3
>>> x
1
>>> y
[2, 3]

>>> def foo(x, *args):
>>>     print(x)
>>>     print(args)

>>>foo(1, 2, 3, 4)
1
[2, 3, 4]

>>> names = ("Jack", "Johnson", "Senior")
>>> fist_name, *surnames =  names
>>> print(surnames)
["Johnson", "Senior"]
23.Python中tuple实现和list相似的`append`操作:参考资料:
a = []
a.append(1)
>> a
[1]

b = ()
b += (1,)
>> b
(1,)

c = (1,)
>> c
(1,)
c += (2,)
>> c
(1,2,)25.使用smtplib发送邮件:参考资料:
import smtplib
from email.mime.text import MIMEText
from email.header import Header

sender = 'tom89757@outlook.com'
receivers = ['2689980244@qq.com']
# smtp = smtplib.SMTP()
# smtp.connect('smtp-mail.outlook.com', 587)
# smtp.login('tom89757@outlook.com', 'QmB2/!D4J.vr3t2')


if __name__ == "__main__":
    message = MIMEText('Python 邮件发送测试...', 'plain', 'utf-8')
    message['From'] = Header("菜鸟教程", 'utf-8')
    message['To'] = Header("测试", 'utf-8')

    subject = 'Python SMTP 邮件测试'
    message['Subject'] = Header(subject, 'utf-8')

    try:
        smtpObj = smtplib.SMTP()
        smtpObj.connect('smtp-mail.outlook.com', 587)
        smtpObj.login('emal_address', 'email_password')
        smtpObj.sendmail(sender, receivers, message.as_string())
        print("邮件发送成功")

    except smtplib.SMTPException:
print("Error: 无法发送邮件")27.将dotfiles中pip的配置文件`pip.int`链接到:参考资料:
mklink C:\Users\26899\AppData\Roaming\pip\pip.ini D:\Desktop\dotfiles\python\pip.ini

mklink %APPDATA%\pip\pip.ini D:\Desktop\dotfiles\python\pip.ini```py
WARNING: Retrying (Retry(total=4, connect=None, read=None, redirect=None, status=None)) after connection broken by 'ProxyError('Cannot connect to proxy.', NewConnection
Error('<pip._vendor.urllib3.connection.HTTPSConnection object at 0x0000026F50B448C8>: Failed to establish a new connection: [WinError 10061] No connection could be made
because the target machine actively refused it'))': /simple/pytest