Pytorch文档01
本文记录Pytorch中一些常用类、函数和概念的文档(主要由官方文档翻译而来)和对它们的理解。
torch.nn.parameter.Parameter
其完整声明形式为:
1 | CLASS torch.nn.parameter.Parameter(data=None, requires_grad=True) |
torch.nn.parameter.Parameter有如下的继承关系:
1 | class Parameter(torch.Tensor): |
一种Tensor,可以被认为是一个模型参数。
Parameter是Tensor的子类,当和Module一起使用时有一种专门的特性——当被赋值作为模型属性时它们会自动地添加到模型的参数列表中,并且将会出现在parameter()迭代器中。给模型属性赋值一个张量时则没有这种作用。这是因为用户可能想存储一些临时状态,像在模型中RNN的最后的隐藏状态。如果没有类似Parametr这样的类,这些临时的值也会被注册。
参数:
data(Tensor):参数张量。requires_grad(bool, optional):如果参数要求梯度,看 Locally disabling gradient computation 了解更多的细节,默认为True。
参考资料:
torch.nn.functional
静态函数库。其包含的函数可分为以下几种类型:
- Convolution function
- Pooling function
- Non-linear activation functions
- Linear functions
- Sparse functions
- Distance functions
- Loss functions
- Vision functions
- DataParallel functions (multi-GPU, distributed):
torch.nn.parallel.data_parallel
torch.nn.init
静态函数库,用于权重等的初始化
torch.nn.init.kaiming_normal_
其完整声明形式为:
1 | torch.nn.init.kaiming_normal_(tensor, a=0, mode='fan_in', nonlinearity='leaky_relu') |
根据 Delving deep into rectifiers: Surpassing human-level performance on ImageNet classification - He, K. et al. (2015) 中描述的方法使用正态分布给输入Tensor填充值。结果Tensor的值取样于。其中:

也被称之为何氏初始化(He initialization)
参数:
tensor:一个n维torch.Tensora:the negative slope of the rectifier used after this layer (only used with'leaky_relu')mode:'fan_in'(默认)或者'fan_out'。选择'fan_in'在前向传播过程中保存权重方差大小;选择'fan_out'在反向传播过程中保存方差大小。nonlinearity:非线性函数(如nn.functional名),建议只使用'relu'或'leaky_relu'(默认)。
调用实例:
1 | w = torch.empty(3, 5) |
torch.nn.init.zeros_
其完整声明形式为:
1 | torch.nn.init.zeros_(tensor) |
使用标量0来填充输入Tensor.
调用实例:
1 | w = torch.empty(3, 5) |
torch.nn.init.ones_与之类似,使用标量1填充输入Tensor。
参考资料:
torch.nn.functional vs torch.nn
前者使用静态的函数,后者则定义了一个nn.Module类。对nn.Module类来说,如nn.Conv2d,其拥有一些内置的属性如self.weight,并不需要传递weights和bias等参数(模块通常会在其forward方法中调用对应的函数);而对functional.Conv2d来说,其只是定义了操作,需要给其传递所有的参数。
所以下述两种关于Conv2D的实现是等价的:
1 | class MyModel(nn.Module): |
1 | class MyModel(nn.Module): |
但下面的操作将weights、bias值和conv2d操作进行了解耦。
经验上看,由于relu等操作不需要像Conv2d操作一样需要对参数进行更新,通常在forward中直接通过F.relu进行调用,而不需要在__init__中初始化nn.ReLU模块。
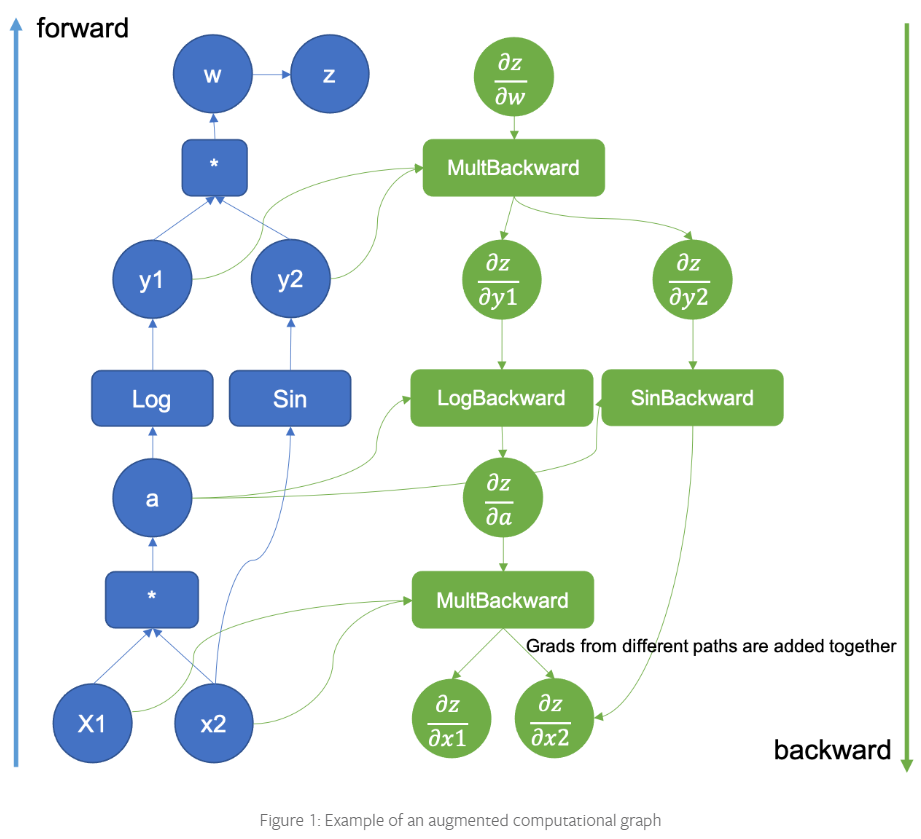
这里补充下面第5和第6个参考资料中提到的有关backward()的知识:
Pytorch使用计算图来计算backward gradients,计算图会追踪在forward pass中做了哪些操作。任何在一个Variable上做的惭怍隐式地被registered。然后就只需要从variable被调用的地方反向穿过计算图根据导数的链式法则来计算梯度。下面是Pytorch中计算图的一个可视化图片:
参考资料:
Pytorch Internals
PS:Linux系统中site-packages路径为../anaconda3/envs/mobilesal/lib/python3.6/site-packages/
参考资料:
nn.Module.forward
为什么在下述代码中通过model(input)获取output,而不是model.forward(input)。
1 | class MyModel(nn.Module): |
当直接调用model时,会调用内置的__call__函数。在代码 the code 中可以看到,该函数会管理所有的registered hooks并且在之后调用forward。这也是应该直接调用model的原因,因为可能hooks可能不会work。
参考资料:
nn.Upsample
对一个给定的多通道 1D (temporal), 2D (spatial) 或 3D (volumetric) 数据进行上采样。
参考资料:
torch.utils.data
该 package 的核心类为 torch.utils.data.DataLoader,表示在一个数据集上的迭代,其支持:
- map-style 和 iterable-style 的数据集
- 定制化数据加载顺序
- 自动 batching
- 单线程和多线程的数据加载
- 自动内存 pinning (固定)
这些选项通过以下的 DataLoader 对象的构造器配置,其有signature:
1 | DataLoader(dataset, batch_size=1, shuffle=False, sampler=None, |
Dataset Types
DataLoader构造器最重要的参数为dataset,它指定了从中加载数据的数据集对象。PyTorch支持两种不同类型的数据集:
- map-style datasets
- iterable-style datasets
Map-Style datasets
一个map-style的数据集需要实现__getitem__()和__len__()这两个protocols,表示从indices/keys (可能非整型) 到 data samples的映射。
protocols: 管理数据传输和接收的形式和步骤,如HTTP protocol。
例如,一个数据集,当能够通过dataset[idx]访问时,可以从磁盘上的文件夹中读取第idx张image和它对应的label。详见 Dataset
Iterable-style datasets
一个iterable-style的数据集是IterableDataset子类的一个实例,该子类需要实现__iter__() protocol,并且表示在data samples上的一个迭代。这种类型的数据集尤其适合这种情况,当随机读取代价很大甚至不可能,或者batch size依赖于所获取的数据。
例如,一个数据集,当调用iter(dataset)时,可以返回来自数据库、远程服务器甚至实时生成的logs的数据读取流。详见 IterableDataset
PS:当使用IterableDataset进行multi-process data loading时,相同的数据对象在每个worker process上重复,因此必须对副本进行不同的配置以避免重复数据,可以看 IterableDataset文档了解如何实现。
Data Loading Order and Sampler
对于 iterable-style 数据集,数据加载顺序完全由用户定义的迭代器控制。这允许更容易的chunk-reading和动态的batch size的实现(如,通过每次生成一个 batched sample)
本节的剩余部分关心map-style数据集的情况。torch.utils.data.Sampler类被用来指定在数据加载中使用的indices/keys的序列。它们代表在数据集indices上的迭代器对象,例如,在SGD (stochastic gradient decent) 的公共实例中,一个Sampler可以任意排列indices的列表并且每次生成一个indice,或者对于mini-batch SGD生成少量indices。
一个sequential或者shuffled的sampler将会自动根据传递给Dataloader的shuffle参数构造。可选地,用户可能使用sampler参数来指定一个custom Sampler object,每次生成要取的下一个index/key。
一个可以一次生成一个batch indices列表的custom Sampler可以作为batch_sampler参数传递。automatic batching可以通过batch_size和drop_last参数来开启。详见下节获取细节。
PS:sampler和batch_sampler都不兼容iterable-style数据集,因为它们没有key/index的概念。
Loading Batched and Non-Batched Data
DataLoader支持自动地将通过batch_size、drop_last、batch_sampler和collate_fn(有默认函数)参数的每个取到的data samples整理到batches中。
Automatic batching(default)
最通用的情况,对应取得 a minibatch of data并将它们整理进batched samplers,例如整理一维Tensors为batch的维度。
当batch_size(默认为1)不为None时,data loader生成batched samples而不是individual samples,batch_size和drop_last被用来指定data loader如何获取batches of dataset keys。对于map-style数据集,用户可以选择指定batch_sampler,其将一次生成一个list of keys。
PS:batch_size和drop_last是用来从sampler中构建一个batch_sampler的关键。对于map-style数据集,sampler要么由用户提供,要么基于shuffle参数构建。对于iterable-style数据集,没有sampler或batch_sampler的概念
在通过sampler的indices取得 a list of samples后,作为collate_fn参数传递的函数被用来将list of samples整理为batches。在这种情况下,从map-style数据集中的加载数据可以大致等价于:
1 | for indices in batch_sampler: |
从iterable-style数据集中加载数据可以大致等价于:
1 | dataset_iter = iter(dataset) |
一个custom collate_fn 可以被用来 customize collation,例如,填充序列数据到batch的最大长度。
Disable automatic batching
在某些情况下,用户可能想在数据集中手动管理batching,或者只是简单地加载individual samples。例如,可能直接加载batched data代价更小(例如从数据库中进行块访问,或者读取连续的内存块),或者batch size是数据依赖的,或者程序被设计在individual sample上运行。在这些情况下,不使用automatic batching(使用collate_fn整理samples)可能更好,此时可以让数据加载器直接返回dataset对象的每个成员。
当batch_size和batch_sampler都为None时(默认batch_sampler为None,就禁止了automatic batching。每个从dataset中获取的sampler被作为collate_fn参数传递的函数处理。
当禁止automatic batching,默认的collate_fn简单的转换Numpy arrays为Pytorch Tensors,并且保持everything else untouched。
在这种情况下,从一个map-style数据集中加载数据可以大致等价于:
1 | for index in sampler: |
从一个iterable-style数据集中加载数据可以大致等价于:
1 | for data in iter(dataset): |
Working with collate_fn
当启用或禁用automatic batching时,collate_fn的使用略有不同。
当禁用batching时,collate_fn被单个的data sample调用,输出从data loader iterator中生成。这种情况下,默认的default_fn简单地转换Numpy arrays为Pytorch tensors。
当启用batching时,collate_fn每次被a list of data samples调用,需要将生成的input samples整理为a batch。本节的剩余部分描述默认的collate_fn (default_collate()) 的行为。
例如,如果每个sample包含一个3-channel的数据和一个整型的class label,也就是说,dataset的每个元素返回一个tuple (image, class_index),默认的collate_fn会整理这样的list of tuples到a single tuple of a batched image tensor和a batched class label Tensor。尤其是,默认的collate_fn有如下的属性:
- 总是将batch dimension作为新的dimension
- 自动地转换NumPy arrays和Python numerical values为PyTorch Tensors
- 保留数据结构,例如如果每个sample为一个dictionary,它输出一个有相同set of keys的dict,但是将batched Tensors作为值(或者lists,如果值不能转换为Tensors)。对list、tuple、namedtuple都是如此。
… (文档中提及许多暂时用不到的知识,暂略)
Memory Pinning
从主机到GPU的数据的copies会快得多,当它们从 pinned (page-locked) memory 中创建时。详见 Use pinned memory buffers 如何更通用地使用 pinned memory。
对于数据加载来说,传递pin_memory=True给Dataloader将自动的把获取到的数据放在pinned memory,因此会使得对CUDA-enabled GPUs有更快的数据传输。
默认的memory pinning logic 只会识别Tensors和包含Tensors的maps/iterables。默认,如何pinning logic看到一个custom type (如果你有一个collate_fn返回一个custom batch type),或者你的batch的每个元素为一个custom type,pinning logic不会认出它们,并将返回batch(或元素)而不pin the memory。为了对custom batch或者custom data type进行memory pinning,需要在custom type中定义一个pin_memory()方法。如下所示:
1 | class SimpleCustomBatch: |
参考资料:
=======
d19dd391c64848b2ec1fd8b1d11d2660466f7856