Pytorch中知识点02
本文记录一下在实现 DDRQM 过程中的一些 Pytorch 框架和 python 相关知识点。
1.torch.utils.data.Dataset:一个表示数据集的抽象类。
其完整形式为:CLASS torch.utils.data.Dataset(*args, **kwds)。
所有表示从keys到data samples的映射的数据集都应该是该抽象类的子集。它的所有子类都应该重写__getitem__()方法,从而支持通过key获取data sample;其子类可以选择重写__len__()方法,该方法返回许多通过Sampler实现或Dataloader默认实现的数据集尺寸。a
PS:Dataloader默认构造一个生成整数索引的index sampler,要想其对一个具有非整数的indices/keys的 map-style 的数据集生效,需要提供定制化的sampler。
参考资料:
2.Creating a Custom Dataset for your files:给自己的文件创建一个定制化的数据集。
一个定制化的数据集必须实现三种函数:__init__、__len__和__getitem__。看一下经典的 FashionMNIST 数据集的实现,我们可以发现图像存储在img_dir目录中,labels 存储在一个 CSV 文件annotation_file中。下面我们看一下在每个函数中发生了什么:
1 | import os |
__init__:该函数在实例化数据集对象的时候运行一次,该函数初始化包含图像数据的目录,注释文件和 transforms。labels.csv文件格式如下图所示:
1 | tshirt1.jpg, 0 |
__len__:该函数返回数据集中的样本数目-__getitem__:该函数加载和返回在给定索引idx处的一个样本。基于索引,该函数定位在磁盘中图像的位置,通过read_image将其转换为一个tensor,从self.img_labels的 csv 数据中取到对应的 label,如果需要的话在它们身上应用 transform 函数,最后以元组的形式返回 tensor 图像和对应的 label。
参考资料:
3.argparse:Parser for command-line options, arguments and sub-command.
其源码位于Lib/argparse.py。下面是该 API 的参考信息,argparse模块使得写用户友好的命令行界面变得很容易,该程序定义了它要求的 arguments,argparse将推算出如何从sys.argv中解析出这些 arguments。当用户给出对程序来说无效的 arguments 时argparse模块也就自动生成帮助信息和错误信息。下面通过例子来说明:
在编程中,arguments 是指在程序、子线程或函数之间传递的值,是包含数据或者代码的独立的 items (表示一个数据单元) 或者 variables。当一个 argument 被用来为一个用户定制化一个程序时,它通常也被称为参数。在 C 语言中,当程序运行时,argc (ARGumentC) 为默认变量,表示被加入到命令行的参数的数量(argument count)。
下面的代码是一个将一系列整数作为输入的程序,并得到它们的和或者最大值:
1 | import argparse |
假设上述代码存入prog.py文件。它能够在命令行运行并提供有用的帮助信息:
1 | $ python prog.py -h |
当从命令行给出有效的 arguments 时,会打印出这些整数的和或者最大值:
1 | $ python prog.py 1 2 3 4 |
当传入无效的 arguments 时,会生成一个 error:
1 | $ python prog.py a b c |
下面对这个例子做详细说明:
-
Creating a parser:第一步使用
argparse模块创建一个ArgumentParser对象1
parser = argparse.ArgumentParser(description='Process some integers.')
该
ArgumentParser对象包含将命令行解析为 Python data types 的所有必要的信息。 -
Adding arguments:通过调用
add_argument()方法向ArgumentParser对象填入和程序 arguments 有关的信息。通常来说,这些调用告诉ArgumentParser如何取得命令行中的字符串并将其转化为对象。这些信息被存储起来并可以通过调用parse_args()来使用,例如:1
2
3
4
5
6
7
8parser = argparse.ArgumentParser(description='Process some integers.')
parser.add_argument('integers', metavar='N', type=int, nargs='+',
help='an integer for the accumulator')
parser.add_argument('--sum', dest='accumulate', action='store_const',
const=sum, default=max,
help='sum the integers (default: find the max)')
args = parser.parse_args()调用
parse_args()将会返回一个具有两个 attributes ——integers和accumulate的对象,integers属性是一个或多个整数值的列表;accumulate是sum()或max()函数。 -
Parsing arguments:
ArgumentParser通过parse_args()解析 arguments。其过程中会监测命令行,并将每个 argument 转换为合适的 type,然后采取合适的 action。在大多数情况下,这意味着将从命令行解析的 attributes 中创建一个简单的Namespace对象。1
2parser.parse_args(['--sum', '7', '-1', '42'])
Namespace(accumulate=<built-in function sum>, integers=[7, -1, 42])
更详细的内容可见:Argparse Tutorial
参考资料:
4.Reading and Writing Files:读取和写入文件
open()返回一个文件对象(file object),该函数通常通过两个 positional arguments 和 一个 keyword argument 进行调用:open(filename, mode, encoding=None)。如下图所示:
1 | f = open('workfile', 'w', encoding='utf-8') |
- 第一个参数表示文件名;
- 第二个参数表示打开文件的模式,
r表示文件只读,w表示文件只写(已存在的同名文件中数据将被擦除),a表示在文件内容之后appending,写入文件中的数据将被添加到文件最后,r+表示文件可同时读和写,模式参数是可选的,默认为r - 第三个参数表示文件的编码格式,正常情况下文件以
text模式打开,从该文件中读取和写入字符串。当编码格式没有被指定时,默认编码格式是platform dependent,由于 UTF-8 是现行的标准,建议使用该格式。在text模式,在读取文件时会将platform-specific line endings转换为\n,在写入文件时则反之。
当处理文件对象时建议使用with关键字,其优点在于在操作完成后文件能被合适地关闭,即使异常发生。其也比等价的try-finally块更短:
1 | with open('workfile', encoding="utf-8") as f: |
参考资料:
5.threading.Thread:多线程。
参考资料:
6.multiprocessing.Process:多进程。
参考资料:
7.在python文件中包含from PIL import PILLOW_VERSION代码时,可能会出现如下报错:
1 | ImportError: cannot import name 'PILLOW_VERSION' from 'PIL' (/storage/FT/anaconda3/envs/open-mmlab/lib/python3.7/site-packages/PIL/__init__.py) |
其原因在于在较新的pillow版本中PILLOW_VERSION已被去除,可以代替使用__version__或者安装较老的pillow版本pip install Pillow==6.1。
参考资料:
8.Python中的Logging包,在SCWSSOD中的用法示例为:
1 | import logging as logger |
该模块定义了一系列的函数和类,为applications和libraries实现了一个灵活的event logging system。由一个标准的库模块提供logging API的关键好处在于,所有的Python模块都能加入logging,所以application log可以包含自己的信息以及整合来自第三方模块的信息。简单示例为:
1 | import logging |
参考资料:
9.在Pytorch中register意味着什么?
在pytorch文档和方法名中register意味着“在一个官方的列表中记录一个名字或者信息的行为”。
例如,register_backward_hook(hook)将函数hook添加到一个其他函数的列表中,nn.Module会在forward过程中执行这些函数。
与之相似,register_parameter(name, param)添加一个nn.Parameter类型的名为name的参数param到nn.Module的可训练参数的列表之中。register可训练参数很关键,这样pytorch才会知道那些tensors传送给优化器,那些tensors作为nn.Module的state_dict存储。
参考资料:
10.Pytorch、CUDA版本与显卡驱动版本对应关系:
-
CUDA驱动和CUDAToolkit对应版本

-
Pytorch和cudatoolkit版本
cuda和pytorch版本 安装命令 cuda==10.1 pytorch=1.7.1 conda install pytorch==1.7.1 torchvision==0.8.2 torchaudio==0.7.2 cudatoolkit=10.1 -c pytorchcuda==10.1 pytorch=1.7.0 conda install pytorch==1.7.0 torchvision==0.8.0 torchaudio==0.7.0 cudatoolkit=10.1 -c pytorchcuda==10.1 pytorch=1.6.0 conda install pytorch==1.6.0 torchvision==0.7.0 cudatoolkit=10.1 -c pytorchcuda==10.1 pytorch=1.5.1 conda install pytorch==1.5.1 torchvision==0.6.1 cudatoolkit=10.1 -c pytorchcuda==10.1 pytorch=1.5.0 conda install pytorch==1.5.0 torchvision==0.6.0 cudatoolkit=10.1 -c pytorchcuda==10.1 pytorch=1.4.0 conda install pytorch==1.4.0 torchvision==0.5.0 cudatoolkit=10.1 -c pytorch
参考资料:
11.以如下目录组织文件:
1 | /model |
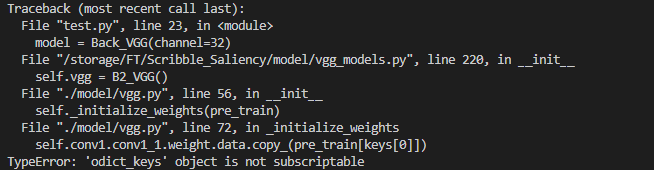
如果test.py文件中包含对vgg_models.py的依赖:from model.vgg_models import Back_VGG
同时,vgg_models.py又包含对vgg.py的依赖:from vgg import B2_VGG。
运行python test.py可能会出现如下报错:

这是由于运行test.py时将当前目录./作为导入包时的本地查找路径,vgg_models.py在导入包时只会在./中查找,而不会在./model/中查找,导致找不到包。此时可以通过在test.py开头添加如下代码把./model/添加为查找路径来解决该问题:
1 | import sys |
也可以插入绝对路径:
1 | import sys |
参考资料:
12.使用cv2.imwrite写入文件时,可能会出现如下问题:

这是由于存入路径save_path+name无文件扩展名,可以通过在name后添加.png扩展名解决。
参考资料:
13.当使用如下代码进行权重初始化时:
1 | def _initialize_weights(self, pre_train): |
可能会出现以下报错:
这是由于在Python2中Class collections.OrderedDict的keys()属性返回的是一个list,而在Python3中其返回一个odict_keys,此时可以通过将odict_keys转换为list解决该问题:
1 | def _initialize_weights(self, pre_train): |
参考资料:
- []‘odict_keys’ object does not support indexing #1](https://github.com/taehoonlee/tensornets/issues/1)
14.为什么在Pytorch中通常使用PIL (即PILLOW) 包,而不是cv2 (即opencv)。有以下几个原因:
- OpenCV2以BGR的形式加载图片,可能需要包装类在内部将其转换为RGB
- 会导致在
torchvision中的用于transforms的functional的代码重复,因为许多functional使用PIL的操作实现 - OpenCV加载图片为
np.array,在arrays上做transformations并没有那么容易 - PIL和OpenCV对图像不同的表示可能会导致用户很难捕捉到bugs
- Pytorch的modelzoo也依赖于RGB格式,它们想要很容易地支持RGB格式
参考资料:
15.在加载模型权重进行测试时,可能会出现如下报错:
1 | Missing keys & unexpected keys in state_dict when loading self trained model |
其原因可能在于在训练模型时使用了nn.DataParallel,因此存储的模型权重和不使用前者时的权重的keys有所不同。其解决方法为,在创建模型时同样用nn.DataParallel进行包装:
1 | # Network |
也可以直接去除.modulekey:
1 | check_point = torch.load('myfile.pth.tar') |
参考资料:
16.tensorboardX vs tensorboard:
参考资料:
17.当在train.py文件中指定了os.environ["CUDA_VISIBLE_DEVICES"] = '1'时,如果在调用的其他文件如utils.py中使用fx = Variable(torch.from_numpy(fx)).cuda()或fx = torch.FloatTensor(fx).cuda(),其默认gpu设备仍然为0,此时应该在utils.py文件中加上:
1 | import os |
18.当scipy版本过高时,如1.7.3。在使用如下代码进行图像存储时:
1 | from scipy import misc |
会报如下错误:
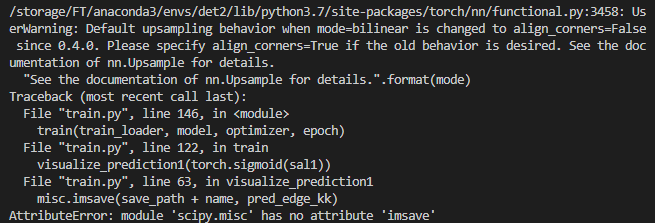
其原因在于在较新的scipy版本中scipy.misc.imsave已经被去除。解决方法为将上述代码改为:
1 | import imageio |
参考资料:
19.Variable deprecated
参考资料:
20.tensor和numpy之间的转换:(张量转换)
- numpy to tensor:
1 | import cv2 |
- tensor to numpy:
1 | import torch |
参考资料:
21.pytorch中的L1/L2 regularization。
参考资料:
22.pytorch报错“CUDA out of memory”,如下图所示:

23.在定义模型时,我们通常使用如下框架的代码:参考资料:
- How to avoid “CUDA out of memory” in PyTorch
- Solving “CUDA out of memory” Error
- RuntimeError: CUDA out of memory. Tried to allocate 12.50 MiB (GPU 0; 10.92 GiB total capacity; 8.57 MiB already allocated; 9.28 GiB free; 4.68 MiB cached)
- FREQUENTLY ASKED QUESTIONS
- How to allocate more GPU memory to be reserved by PyTorch to avoid “RuntimeError: CUDA out of memory”?
- How does “reserved in total by PyTorch” work?[https://discuss.pytorch.org/t/how-does-reserved-in-total-by-pytorch-work/70172]
- pytorch如何使用多块gpu?
- pytorch多gpu并行训练
1 | class Model(nn.Module): |
1 | net = Model(config) |
1 | inputs, labels = data # this is what you had |
26.numpy array与torch tensor之间的转换:
- numpy array to torch tensor
1 | np_array = np.array(data) |
- torch tensor to numpy
1 | na = a.to('cpu').numpy() |
27.查看numpy数组的各属性信息:参考资料:
1 | def numpy_attr(image): |

其原因为数据集中读取的数据超出范围,例如对于n类label的数据,其值应该t>=0 && t<n。本人遇到这种报错的原因为mask数据未做转换:
1 | mask[mask == 0.] = 255. |
29.出现报错:`Boolean value of Tensor with more than one value is ambiguous in PyTorch`。 original code:参考资料:
1 | loss = CrossEntropyLoss(y_pred, y_true) |
1 | # 初始化损失 |
1 | losse = torch.nn.BCELoss() |
1 | edge = edge / 255.0 |