图像处理中知识点01
本文记录一下在实现 DDRQM 过程中的一些 OpenCV 框架和 python 相关知识点。
1.cv2.filter2D():该函数表示在一张图像上应用相应的卷积核,完整的函数调用形式如下:
1 | cv2.filter2D(src, ddepth, kernel[, dst[, anchor[, delta[, borderType]]]]) -> dst |
该函数将任意的 linear filter 应用到一张图像上。当 filter 的部分孔径落在图像之外时,函数会根据 border 类型进行插值。该函数实际上计算的是相关(correlation),而不是卷积(convolution)。
例如,下面代码:
1 | retval = cv2.getGaborKernel(ksize=(111,111), sigma=10, theta=60, lambd=10, gamma=1.2) |
表示将对应的 滤波器应用在图像src.jpg上。
1 | a=cv2.getGaborKernel((40,40), 1.69, 0, 3, 0.5) |
2.cv2.getGaborKernel():该函数为 滤波器函数,其返回值为一个 ,具体形式为一个二维数组,完整的函数调用形式如下:
1 | cv.getGaborKernel(ksize, sigma, theta, lambd, gamma[, psi[, ktype]]) -> retval |
3.代码为:
1 | result[x][y] = abs(depth_img[x][y] - 0.5*(depth_img[x1][y1]+depth_img[x2][y2])) |
报错信息:RuntimeWarning: overflow encountered in ubyte_scalars。
分析:可能是将两个unit8类型的值相加并将其存入一个unit8,导致数值溢出
解决方案:将unit8类型数值转换为int类型。
1 | result[x][y] = abs(int(depth_img[x][y]) - 0.5*(int(depth_img[x1][y1])+int(depth_img[x2][y2]))) |
参考资料:
4.以下代码:
1 | img = cv2.imread(path) |
表示从路径path中读取图像文件并存入img对象中,通过type(img)可知该对象类型为<class 'numpy.ndarray'>。img.shape返回的是一个三元元组,其值分别对应图像的height、width和channels,即图像形状并不是我们熟悉的width * height * channels的形式
可以通过以下代码:
1 | img = cv2.transpose(img) |
将img转置为width * height * channels形状,通过我们熟悉的方式访问。
PS:img中channels顺序为。
参考资料:
5.PILLOW vs OpenCV:
1 | # 读取和加载图片 |
参考资料:
6.cv2.imread()详解:用于读取图像
该函数的完整调用形式为:cv.imread(filename[, flags]) ->retval,retval为返回值。下面对各个参数做具体说明(说明针对C++函数版本):
-
filename:要读取的图像路径,可以为绝对路径或相对路径 -
flags:可以对图像采取的ImreadModes,常见的有cv2.IMREAD_GRAYSCALE、cv.IMREAD_COLOR。
调用实例:
1 | img = cv2.imread('NLPR1.jpg') # 打开并将图像像素值添加到img对象 |
PS:该函数对RGB图的默认读取顺序为。
参考资料:
7.cv2.cvtColor详解:用于转换图像
该函数的完整调用形式为:cv.cvtColor(src, code[, dst[, dstCn]]) ->dst,dst为返回值。下面对各个参数做具体说明(说明针对C++函数版本):
-
src:输入图像 -
dst:输出图像,和src有相同的size和depth,即相同的height、width和channles -
code:颜色空间转换模式ColorConversionCodes,常见的有cv2.BGR2GRAY、cv2.BGR2RGB。 -
dstCn:输出图像的channels数,该参数为0时,根据src和dst自动生成
调用实例:
1 | img_gray = cv2.cvtColor(img, cv2.COLOR_BGR2GRAY) # 将BGR模式的彩色图像转换为灰度图 |
参考资料:
8.cv2.resize()详解:用于放缩图像
该函数的完整调用形式为:cv.resize(src, dsize[, dst[, fx[, fy[, interpolation]]]]) ->dst,dst为返回值。下面对各个参数做具体说明(说明针对C++函数版本):
-
src:输入图像 -
dst:输出图像,当dsize不为0(Python中为None)时,其size与dsize相同;dsize为零时,则与src.size()即fx和fy相同。其类型与src相同。 -
dsize:输出图像尺寸,当dsize为0或None时,计算方式为:dsize = Size(round(fx*sr.cols), round(fy*src.rows))要么
dsize非零,要么fx和fy非零 -
fx:沿着水平轴的放缩因子,当为0时,可以通过(double)dsize.width/src.cols计算 -
fy:沿着垂直轴的放缩因子,当为0时,可以通过(double)dsize.height/src.rows计算 -
interpolation:插值方法,常见的插值方法有cv2.INTER_NEAREST、cv2.INTER_LINEAR,默认为cv2.INTER_LINEAR。
调用实例:
1 | img = cv2.imread('NLPR1.jpg') |
参考资料:
9.cv2.transpose()详解:用于转置矩阵(数组)
该函数的完整调用形式为:cv.transpose(src[, dst]) ->dst。下面对各个参数做具体说明(说明针对C++函数版本):
src:输入数组dst:和src相同类型的输出数组
其效果为:dst(i, j) = src(j, i)。调用实例:
1 | img = cv2.transpose(img) |
参考资料:
10.cv2.flip()详解:用于翻转图像(数组)
该函数的完整调用形式为:cv.flip(src, flipCode[, dst]) ->dst。下面对各个参数做具体说明(说明针对C++函数版本):
src:输入数组dst:输出数组,和src具有相同类型和尺寸flitCode:用来指定怎样翻转数组,0表示沿x轴翻转,正值如1表示沿y轴翻转,-1表示同时沿x轴和y轴翻转,即绕(0,0)翻转
调用实例:
1 | img = cv2.flip(img, 0) |
参考资料:
11.cv2.imshow()详解:用于显示图像
该函数的完整调用形式为:cv.imshow(winname, mat) ->None。下面对各个参数做具体说明(说明针对C++函数版本):
winname:窗口名,显示在窗口顶栏mat:要显示的矩阵
调用示例:
1 | img = cv2.imread('NLPR.jpg') |
参考资料:
12.cv2.waitKey()详解:用于指定窗口打开时间
该函数的完整调用形式为:cv.waitKey([, delay]) ->retval。下面对各个参数做具体说明(说明针对C++函数版本):
delay:表示窗口的持续时间,为0时表示保持窗口打开,为其他正值时表示窗口持续的毫秒数
调用示例:
1 | cv2.imshow('img', img) |
参考资料:
13.cv2.destroyAllWindows()详解:用于关闭所有 HightGUI 窗口
该函数的完整调用形式为:cv.destroyAllWindows() ->None。
调用实例:似乎不会关闭窗口
1 | cv2.imshow('img', img) |
PS:cv2.destroyWindows(winname)用于关闭指定窗口
参考资料:
14.python中获取当前目录路径和上级路径:
1 | import os |
参考资料:
15.cv2.GaussianBlur()详解:用于给图片添加高斯模糊
该函数的完整调用形式为:
cv.GaussianBlur(src, ksize, sigmaX[, dst[, sigmaY[, borderType]]]) ->dst
下面对各个参数做具体说明(说明针对C++函数版本):
src:输入图像,图像有不同的通道,会被分别处理dst:输出图像,类型和尺寸与src相同ksize:高斯核尺寸。ksize.width和ksize.height必须为正奇数;否则ksize为0,此时其值通过sigmaX和sigmaY计算sigmaX:在X方向上的 Gaussian kernel standard deviationsigmaY:在Y方向上的 Gaussian kernel standard deviation。为0时设为与sigmaX相等。borderType:像素外插值方法,常见的有cv.BORDER_CONSTANT、cv.BORDER_REPLICATE,不支持cv.BORDER_WRAP。
为了完全控制对图片的操作而不需要管OpenCV后续对语义的修改,建议对ksize/sigmaX/sigmaY都进行指定。
调用实例:
1 | depth_img = cv2.imread('NLPR2_depth.png', 0) |
参考资料:
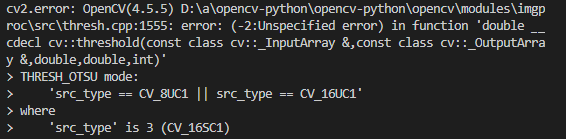
16.cv2.threshold():用于对每个数组元素应用固定水平的阈值。该函数通常用于从一个灰度图中得到二值图像或者去除噪音(即过滤掉太小或太大的值)。该函数支持几种阈值,通过类型参数来设置。
与此同时,THRESH_OTSU和THRESH_TRIANGLE可以联合上述的值来使用。这种情况下,函数通过 Otsu 或者 Triangle 算法来计算最优的阈值。
PS:目前,Otsu 算法和 Triangle 算法只在 8-bit 的单通道图像上实现
该函数的完整调用形式为:
cv.threshold(src, thresh, maxval, type[, dst]) ->retval, dst
src:输入数组(多通道,8-bit 或者 32-bit 浮点数)dst:和src同尺寸、类型和通道的输出数组thresh:阈值maxval:在使用THRESH_BINARY和THRESH_BINARY_INV参数时的最大值type:阈值类型,常见的有THRESH_BINARY和THRESH_BINARY_INV。
参考资料:
17.cv2.imwrite():用于存储图片到指定文件,图片类型取决于文件后缀名。其完整声明形式如下:
1 | cv.imwrite(filename, img[, params]) -> retval |
filename:存储文件名img:图片数据对应的矩阵params:成对的指定存储格式的参数。
参考资料:
18.cv2.Canny():用于通过算法查找图像边缘。其完整声明形式如下:
1 |
|
该函数在输入的图像中查找边缘并通过算法在输出中标记出它们。在threshold1和threshold2中最小的值将用于edge linking,最大值将用于查找初始的更为强烈/显著的边缘。具体见 Canny edge detector
image:8-bit的输入图片edges:输出的 edge map,8-bit单通道,和image尺寸相同threshold1:滞后过程(hysteresis procedure)的第一个阈值threshold2:滞后过程的第二个阈值apertureSize:操作子的孔径尺寸L2gradient:a flag。表明是否使用更准确的范数计算图像梯度大小(L2gradient=true),还是使用默认的范数(L2gradient=false)。
调用实例:
1 | import cv2 |
参考资料:
19.cv2.Sobel():使用算子计算图像导数。其完整声明形式如下:
1 | void cv::Sobel(InputArray src, |
该函数通过用合适的核与函数做卷积来计算图像导数。通常,该函数通过xorder=1, yorder=0, ksize=3和xorder=0, yorder=1, ksize=3来计算图像的一阶和导数,分别对应:
这两个核。
src:输入图片dst:相同尺寸和通道数的输出图片ddepth:输出图片depth,见 combinations。(depth指图片的数据类型,例如对应图像梯度你想要16bit而不是8bit。当输入图片为8-bit类型时,将导致梯度裁剪(精度不够)dx:梯度的orderdy:梯度的orderksize:核尺寸,必须是1/3/5/7。scale:计算梯度值时的可选因子,默认不提供delta:在dst中存储结果之前默认加到结果上的可选delta值。borderType:像素插值类型。
参考资料:
20.numpy.ndarray.flatten():返回一个坍缩成一维的数组的副本。
调用实例:
1 | a = np.array([[1,2], [3,4]]) |
参考资料:
21.math.atan(x)vsmath.atan2(y, x):
atan返回x对应的arc tangent,其结果所属区间为;
atan2(y, x)则返回atan(y/x),其结果所属区间为。
举例来说,atan(1)=atan2(1,1);atan2(-1,-1)。
参考文献:
22.numpy.zeros:用于返回给定shape和type的用零填充的新的数组。其完整调用形式为:
1 | numpy.zeros(shape, dtype=float, order='C', *, like=None) |
shape:指定数组形状,如(2, )或(2,3)。dtype:指定填充的数据类型,如dtype=int,默认为numpy.float64。order:指定行优先还是列优先,默认为order='C',行优先,order='F'表示列优先。like:引用对象,用于创建非Numpy arrays类型的数组,可以兼容其他类型的数组。
调用实例:
1 | np.zeros(5) |
PS:numpy.ones与之类似
参考资料:
23.在进行灰度图转为BGR图img = cv2.cvtColor(gray, cv2.COLOR_GRAY2BGR)之前,需要确保灰度图gray中数值的类型满足转换要求,否则会出现如下错误:
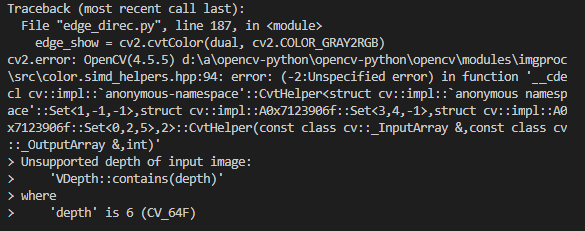
可以通过gray = np.uint8(gray)将灰度图转换为满足条件的格式:
参考资料:
24.numpy.sum:计算给定axis上数组的元素之和。其完整调用形式为:
1 | numpy.sum(a, axis=None, dtype=None, out=None, keepdims=<no value>, initial=<no value>, where=<no value>)[source] |
a:数组类型的对象axis:None、整数或整数类型的元组,可选。默认为None,将对所有元素求和。dtype:数据类型,可选。out:用于存放求和结果的输出数组,可选。- 略
调用实例:
1 | a = np.ones((10,2), dtype=int) |
参考资料:
25.在算法实现中使用时出现以下报错:
1 | RecursionError: maximum recursion depth exceeded in comparison |
其出现原因为递归序列太长超过了系统设置,可以通过以下方式查看系统设置的最大递归深度:
1 | import sys |
此时可以通过两种方式解决该问题:
- 设置更大的系统递归深度:
sys.setrecursionlimit(1000*1000+10) - 优化算法,采用更高效的方式实现。(推荐)
参考资料:
26.当判断python字典中是否存在某个key时,has_key()方法在python中无法使用:

其原因在于has_key()方法在Python3中被去除。
通过for i, j in img_depth_pair.keys:遍历字典键时,会出现如下报错:

其原因在于dict.keys为不可迭代对象,此时应该通过以下方式遍历key和value:
1 | for key in img_depth_pair: |
此外,值得补充的是,列表不能作为python字典的键,而元组可以,这一特性源自python语言的设计。
参考资料:
27.在OpenCV中进行图像处理时,经常会出现类似于下列的数据类型的问题:
下面是OpenCV中各种数据类型的参考列表:
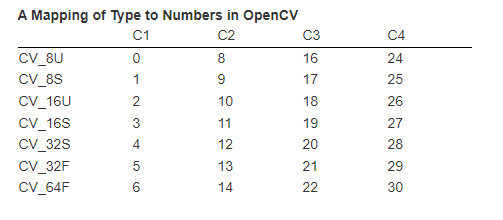
其中C1/C2/C3/C4表示通道数。0~30表示编号。
下面是一个更为详细的列表:
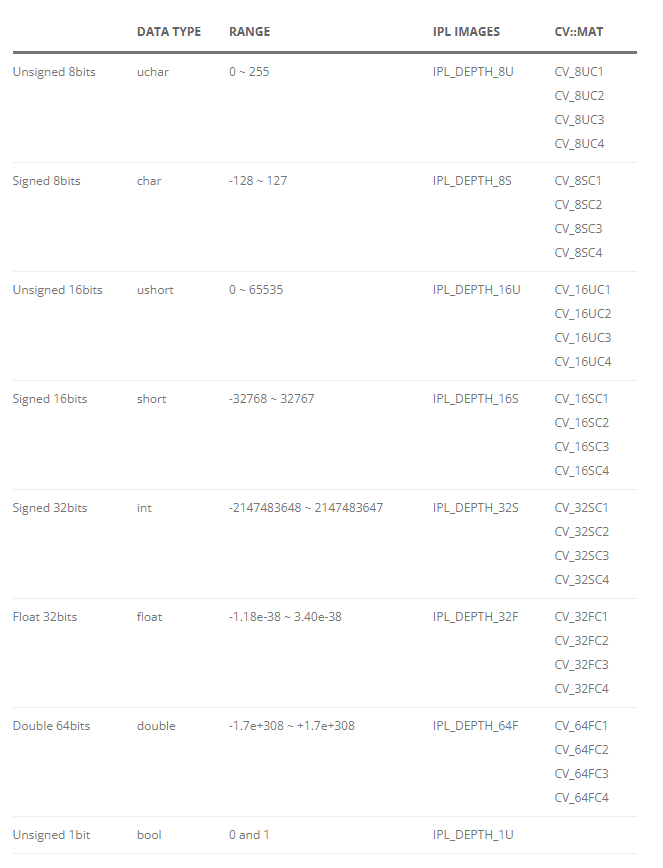
参考资料:
28.在使用numpy中的dtype(data type)参数时,常疑惑于参数类型的选择,此处对常用的dtype类型做一个梳理:
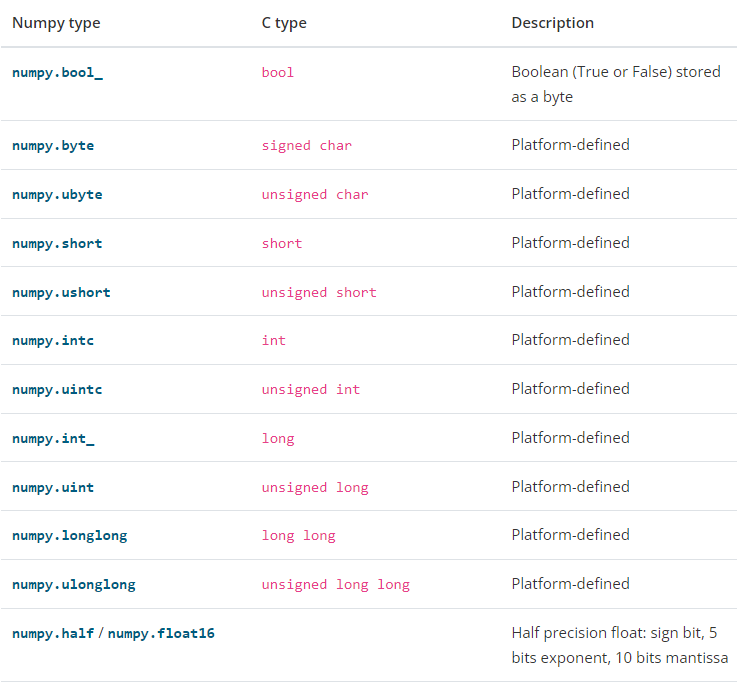
PS:上述列表并未展示所有的dtype类型,详见参考资料:
参考资料:
29.在使用cv2.imshow('img', img)时,传入的img的dtype需要为np.uint8类型,否则展示的图片会出现奇怪的扭曲 (distortion):(numpy类型转换)
1 | import numpy as np |
参考资料:
30.在使用以下代码进行图片展示时:
1 | cv2.imshow('edge', edge) |
可能出现如下错误:
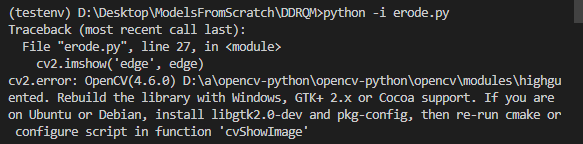
此时可能是本地的OpenCV包出现了编译错误,可以通过重装解决:
-
pip uninstall opencv-python -
pip install opencv-python